


These days, camera manufacturers are obsessed with adding “k’s” to their resolutions and offering progressively higher frame rates for better slow-mo capabilities. And sure, this has revealed a new world of possibilities for post-production effects; but it’s also had unintentional consequences.
Our fascination with the latest and greatest technology has consigned other techniques to the background of our minds, where they lay forgotten and gather dust. One of my favorite long-lost techniques is under-cranking.
In the right hands, under-cranking can add a natural motion blur to your hyper lapse or give product videos a snappier, more engaging style. Because it’s not used that often, under-cranking almost always stands out when compared to more modern filmmaking trends.
Let’s explore how under-cranking works and a few examples of how you can use it in your projects.
Back in the day, camera operators had to crank a handle to roll film through the camera. It seems like a tiring, thankless process.
If the camera was cranked quickly, more footage was exposed, which meant more frames and a more detailed look with slower movements. Welcome to over-cranking. If our camera guy cranked his camera slowly, fewer frames would be captured and movements would look jerky and sporadic. This technique was dubbed under-cranking.
Everyone knows the story of over-cranking, because it went on to become what we think of as slow motion, (i.e.. the obsession of every camera company).
But under-cranking stayed around too, and it found a steady job in action films. After all, fewer frames produces faster looking movement.
This is particularly relevant when you’re shooting a fight scene. You’re not going to want actors (or their stunt doubles) going full speed during the take — unless you’re alright with someone taking a full-force roundhouse kick to the face.
Instead, you under-crank the camera, capture fewer frames, and film the shot in a way that accelerates movement. You get the same intense effect without the risk of bodily injury.
To be clear, we’re talking about in-camera under-cranking. You’re slowing the frames per second (FPS) down to between 22 or 20.
Now that you’ve got a better grasp of under-cranking, let’s look at a few different applications of these techniques.
Action sequences are the most obvious use of under-cranking. As the last section mentioned, shooting at a slower FPS when recording fight sequences is a longstanding use case.
Rather than retread old ground, let’s look at something more innovative: co-writer/director George Miller’s Mad Max: Fury Road.
From the fleet of custom made vehicles to the 120-minute adrenaline rush of plot, there’s a lot to love about this film. One of the ways Miller made the action scenes so intense was by manipulating the frame rate. In certain key sequences, the camera is clearly under-cranked.
“Something like fifty or sixty percent of the film is not running at 24 frames a second,” said Jason Seale, the DP for the film. “It’ll be running below 24 frames because George Miller, if he couldn’t understand the shot, slowed it down until you could.”
Watch as the under-cranking really kicks in at 1:30:
You wouldn’t think the action in this sequence could get any more intense. After all, we’re in the middle of a post-apocalyptic car chase.
But under-cranking certain shots — and not hiding the effect, but instead emphasizing it — injects an otherworldly intensity. The jerking motion gives the action a lurid aspect, making the viewer feel as if you’re being pulled headlong into the action.
These days, everyone is all about hyper lapses, and you can create one by using the under-cranking method. Think of a hyperlapse as a moving timelapse, or more specifically, a timelapse in which the camera moves a significant distance.
To get that trademark movement in hyperlapses, most people are manually taking photos, stabilizing them in an editing software, and stringing them together. If you like to suffer for your work, this is always an option—but it’s worth considering this type of project from a different angle.
If you significantly under-crank the camera’s FPS, you’ll capture so few frames that any moving objects will inherently have that hyper-realistic motion blur. Of course, we’re talking much lower than 23 or 21 FPS — something more like 10 FPS.
And instead of hours of post-production work, you’ll only have a little touching up to do when it’s time to edit.
However, make sure you shoot with some sort of camera stabilizer to avoid that jerky handheld look. Undercranking makes the subjects’ movements in front of the camera more intense, but it also makes any movement by the camera more exaggerated.
For that reason, I recommend steering clear of shooting with a handheld and instead using a stabilizer (like a Ronin or Zhiyun) or a tripod.
Here’s a video with a few hyper lapses I did for Soundstripe at NAB in 2019:
Since under-cranking isn’t widely utilized for hyperlapses, lots of filmmakers opt for photo-based technique. Essentially, you capture a series of individual images and edit them together to create the hyperlapse effect. On the positive side, since you’re taking megapixel photographs instead of 1080p or 4k video, the image resolution of a photo-based hyperlapse will be superb. All those images give you a lot of options for post manipulation. However, it’s a lot more work on the front-end and back-end. Under-cranking only takes a short time to set up, and it looks great right out of the can.
If you’ve ever filmed a product video, you know they can be challenging — particularly if you don’t have any actors in the shoot.
Sure, working with inanimate objects is less complicated than working with people, but objects are also less compelling. It’s down to you, the filmmaker, to create some interesting shots and make the entire affair engaging.
Under-cranking can be very handy here too. By filming some shots in a lower FPS, you can intersperse that footage with the stuff you filmed at normal speed to create some dazzling effects.
Here’s an example from a shoot I did at Soundstripe:
As you can see, the camera movements are faster, and there’s a snap to them that you can’t get with a normal FPS. The under-cranking also brings a bit of inherent chaos, which adds some much needed drama to these shots.
These are only a couple of examples of how to use under-cranking. I’ve also used them in music videos to add a new dimension. This technique is great, because it doesn’t require a ton of heavy lifting in post production, and the style is unmistakable.
Given the focus on ultra slow-mo, under-cranking is a surefire way to make your next project stand out.
You might also enjoy this article about frame rates and shutterspeed.
This article was written by Chris Haggerty and Zach Watson. Chris is the resident filmmaker at Soundstripe, a royalty free music company. Zach is the content specialist.

Today is part 3 of our series on Color Grading 101. If you’ve been following it, you know that we’ve now covered two of the three ingredients essential to all filmmaking workflows: 1) human vision and 2) cameras.
Now that we understand the way these systems work and interact, we’re ready to take a look at the last of these three ingredients: displays.
Before we do so, let’s run through a quick recap of the imaging process as we’ve considered it thus far.
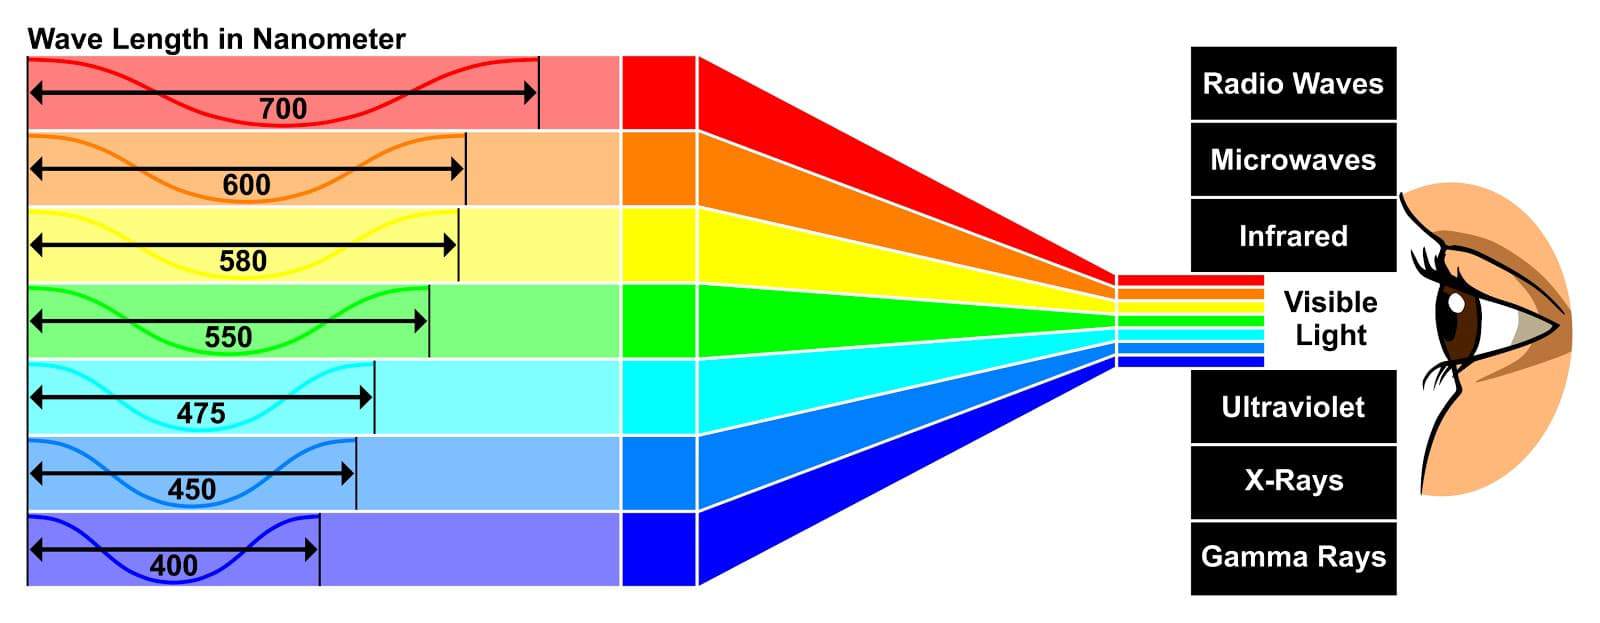
First, our eyes experience a finite range of the electromagnetic spectrum as visible light, from which we form an image. If we wish to capture that image, we use a camera — which, like our eyes, has its own sensitivities and limitations in terms of the electromagnetic radiation it can see and store. As we discussed in Part 2, the particulars of these sensitivities and limitations play a huge role in the character of the final viewable image, and navigating them mindfully is a critical step in successful image reproduction.
Today we’re discussing an equally critical step: understanding the sensitivities and limitations of our display, which we’re going to learn are often completely different from those of our camera. With this understanding in place, we’ll complete our survey of the basic building blocks of an imaging pipeline, establishing the ideal context for discussing the role of color grading within this larger process.
We’re going to start with an overview of the way all displays work — whether a projector, cell phone, or the old CRT TV you used to play video games on. From there, we’ll examine the key properties that define the capabilities and limitations of our displays. Let’s dive in
To begin, let’s review the basic functionality of a display:
With this overall process in mind, let’s now examine the key properties that define our display’s performance.
In order to reproduce pleasing and lifelike images, we need to know the relationship between what our eyes can see and what our display can reproduce. We can determine this relationship by profiling the performance of the display in terms of the below properties — once each is accurately quantified, we prepare our image to give us the best possible match to how it would appear to our naked eye. In the context of this article, to prepare an image is simply to apply one or more mathematical transformations to it, based on the specifications of the display it’s being output to.
This is the property you’re likely most familiar with, as it’s typically the first one that TV manufacturers boast over. While higher resolutions are generally preferable, there’s a point of diminishing returns around 2K, past which the other properties we’ll be looking at can exert an equal or greater influence over our experience of the image. For our purposes, the main point to stress regarding resolution is that we want our input signal’s resolution to match that of our display, which often involves scaling the source material up or down — for example, from 3840×2160 UHD to 1920×1080 HD.
Contrast ratio is perhaps the most fundamental characteristic of a display. As the name implies, it simply denotes the distance between the deepest shadows and the brightest highlights the display is capable of reproducing. This can range anywhere from 700:1 to 1,000,000:1 or higher. The greater the contrast ratio, the more dynamic and lifelike the image becomes. Some display technologies, such as LED and QLED, excel at reproducing bright highlights, but are less capable when it comes to shadow reproduction. Others, such as OLED, have excellent shadow reproduction, but fail to get as bright as their LED counterparts.
It’s also worth noting that since contrast ratio is determined by both of these factors, two displays with the same contrast ratio can still have markedly different performance in shadows or highlights.
Another term for contrast ratio is dynamic range, which you’ll remember from our prior installments on human vision and cameras. Both terms are simply a way of expressing the breadth of values from deepest shadows to brightest highlights. In the case of vision and cameras, we use it to describe the maximum range we can resolve or capture, and in the case of displays, the maximum range we can reproduce.
Contrast ratio is also one of the key factors in determining whether a display is classified as HDR (high dynamic range) or SDR (standard dynamic range) — the ratio for an HDR display will always be significantly higher than for an SDR display.
The tone curve of a display refers to the way the luminance values are distributed as our signal moves from deepest shadows to brightest highlights. For example, In a linear tone curve, a doubling of the signal would lead to a doubling of the light emitted by the display. This sounds straightforward, but it turns out that our eyes don’t perceive light in a linear fashion. Because of this, displays don’t either — they typically employ a gamma curve, which “bends” the entire signal downward, distributing the luminance values in a manner that feels perceptually linear.
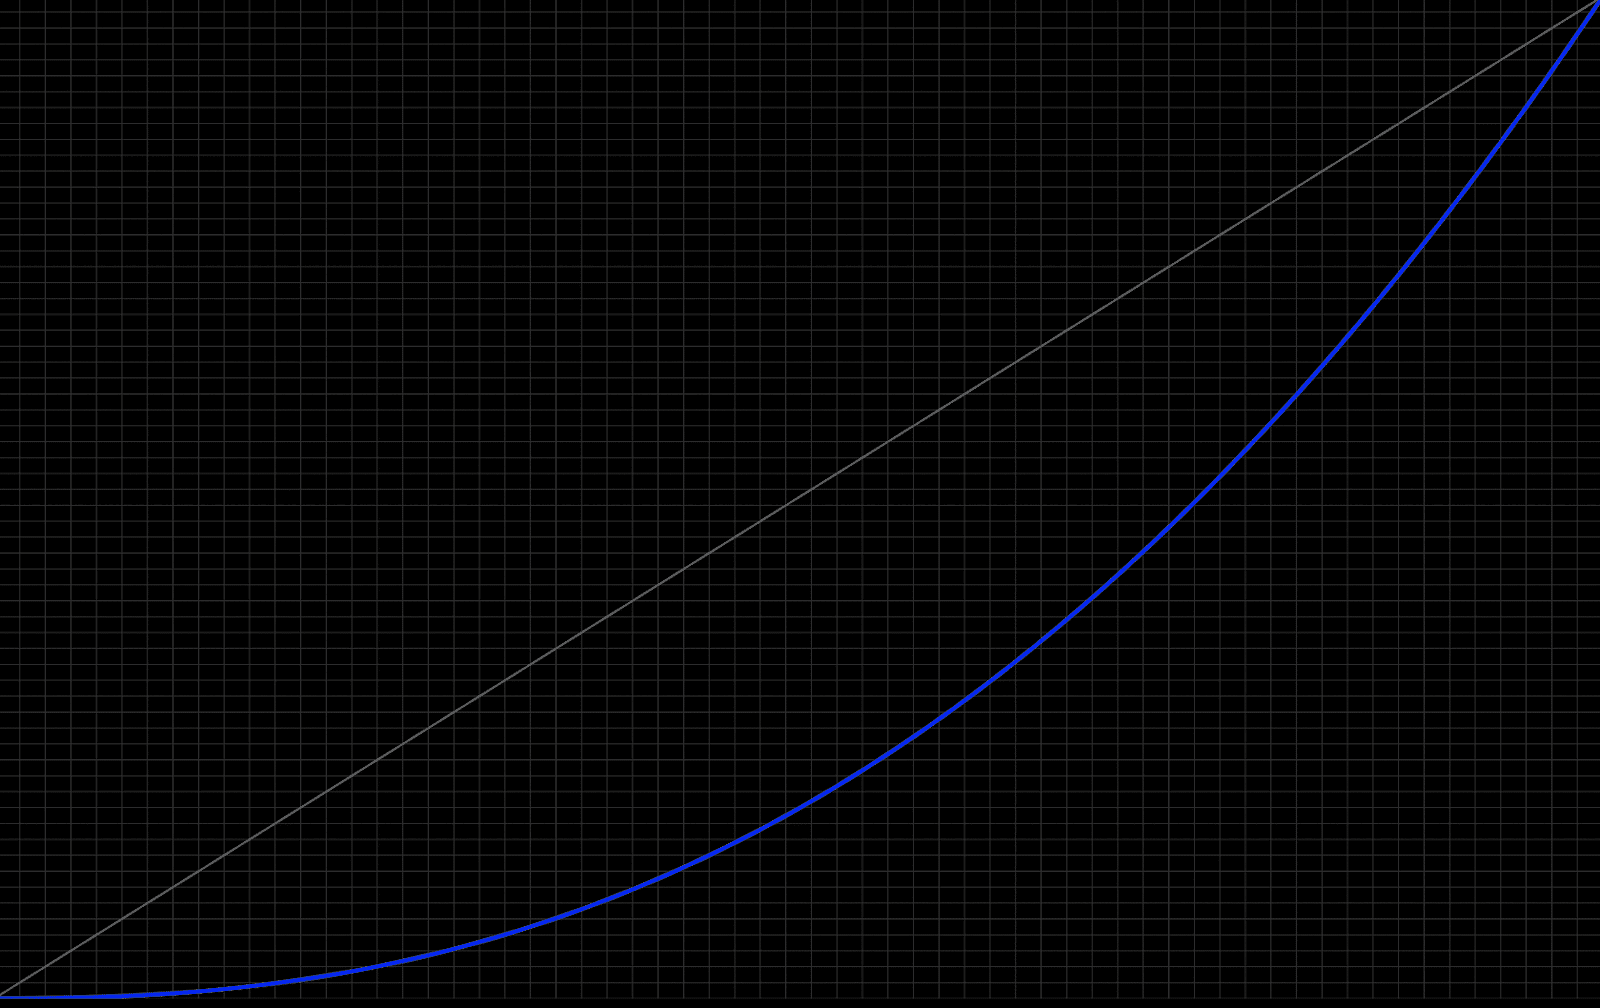
There are multiple flavors of gamma curve, including Gamma 2.4, Gamma 2.2, Gamma 2.1, and BT.1886. Knowing which of these curves our display expects and can faithfully reproduce is critical to properly preparing our signal for the display.
This is another concept we’ve discussed in our prior installments. Color gamut refers to the portion of the visible spectrum a particular device is capable of capturing, storing, and/or reproducing. The larger this region, the more vibrant and lifelike the image will be. Common display gamuts include Rec 709, DCI-P3, and Rec 2020.

As with our tone curve, it’s imperative to know the color gamut our display expects and is capable of reproducing, in order to properly prepare our image for it.
When we discussed the basic functionality of a display, we actually glossed over a step between signal input and image output: processing. This can span a wide variety of adjustments to the signal, including scaling, noise reduction, contrast expansion, saturation increase, color temperature shift, and time-based adjustments such as frame rate smoothing. Some of these adjustments happen as static or fixed operations, while others are done dynamically in response to analysis of the incoming signal.
In virtually all cases, these various “enhancements” are designed to improve the perceptual performance of a display, but at the expense of accurately reproducing the filmmaker’s creative intent. If our goal is accurate reproduction, we want to disable as much of this processing as possible, leaving the properly prepared signal untouched as it moves from input to output. In fact, this is the exact agenda of the “filmmaker mode” TV setting being advocated by the UHD Alliance.
HDR (high dynamic range) represents the most exciting development in display technology we’ve seen in many years. So why aren’t we talking more about it in this article?
In short, it’s because SDR (standard dynamic range) and HDR are arbitrary terms for displays capable (or incapable) of reaching specific performance benchmarks for the properties listed above. When we say a display is HDR, all we mean is that it has a higher contrast ratio and a larger color gamut than a traditional SDR display. The end result of these properties makes a huge difference to the way we experience images, but the terminology we use to delineate one from the other is fairly insignificant.
We’ve now reached the halfway point in our Color 101 series, and we’ve covered each of the three ingredients essential to all filmmaking workflows. With these concepts in place, we’re ready to begin studying the tools and techniques of color grading from a holistic perspective, allowing us to maximize our creativity, efficiency, and consistency. We’ll begin this process in Part 4, where we’ll examine the implications of one of the most overlooked decisions in color grading: scene-referred versus display-referred workflows. See you then!
Feature image by Kelvin Design UK on Unsplash

